During one of our recent KaiNexus Training Team Office Hours webinars, we took a deep dive into Boards in KaiNexus. You can watch it here. For those of you who prefer to read rather than watch, this post summarizes the information. Either way, this is an important introduction to one of the most valuable features of KaiNexus.
Location Summary Board Overview
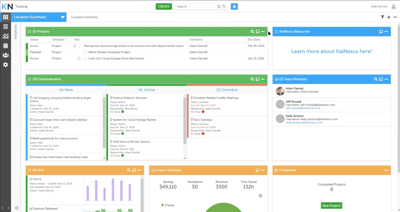
One of the most common Boards built and used by our customers is a Location Summary Board. A Location Summary Board lets you see all the essential information surrounding a given Location's improvement efforts.
The Location Summary Boards are made up of elements called Cards. Each Card can be configured and filtered to meet our specific needs. Common Cards include:
Projects List: This is a list of all of the projects that are happening within the Location; whether you are a team member on that project or not, you can see a complete list of all the projects.
Improvement Workflow: The improvement workflow visualizes improvements moving from New to Active to Overdue.
Freestyle Cards: Freestyle cards that are customizable in an unstructured way. You can add text, links, or images. You can even embed information from another software platform if your solution allows for that.
Team Members (People List Card): It includes a list of users that correspond to the Location.
KPI List: This is the list of performance indicators specific to this Location.
Impact Summary: This is a visualization of all of the impact or change that's been implemented in KaiNexus at any Location. It can include things like cost savings, revenue, and time saved. It is the aggregate of all the impact for the Location.
Widgets Card: The widgets card consists of several items; for example, completed projects and completed improvements. Users can click on the number to drill into the list of items. "Create" widgets can also be included so users can quickly create new projects, improvements, or any other workflows or templates you have set up in KaiNexus.
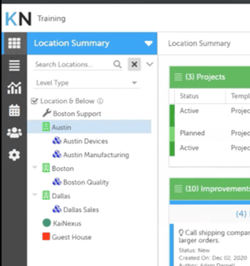
When a user visits the Location Summary Board, by default, they will see all of the information that corresponds to the Location assigned on their user profile. Users can also expand the Location's filter on the left to display the data shown for another location.
Each Location has a level-type associated with it, including sites and departments. Filtering by location level-type is a way to report horizontally across the organization rather than vertically.
Location Boards are useful to executives who can see the organization's activities and individual team members because they can see precisely what their team is working on. The Board helps with collaboration and accountability.
Creating Boards
To create a new Board, use the Board picker drop-down to select the "Create Board" option. That will bring up the create Board screen. Here you can: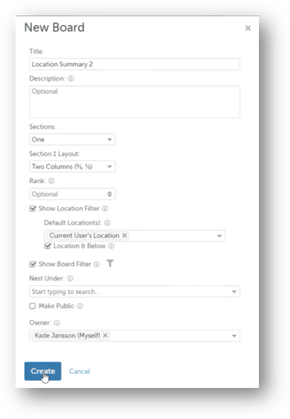
- Give your Board a name
- Determine how many sections you need
- Choose the column layout of the Board from the drop-down options
- Turn on the location filter
- Set the default location to that of the user
- Enable the show Board filter option
Once you create the Board, you will have a blank Board. The first step is to start adding cards to the Board. Click the + icon on the top right side of the Board. Select the Card you want to add first, and give it a name. Next, apply the filter set to the Card. The Card will then be added to your Board.
If you are creating multiple cards that share many similarities, you can click the ellipsis (...) on the Card and make a copy to be applied to this Board or other Boards. You can then edit the copy of the Card and give it a new name and different filters.
List Card
After your List Card is set up, you can choose from several view types. By clicking the ellipsis, you will see different view types:
Detail view: Gives one line per item in a list along with some contextual information.
List view: This is a spreadsheet-like column view.
Tree view: The tree view allows you to expand items and see the child items, such as tasks underneath a project.
Once you've selected your view types, you can make edits by clicking the pencil next to the view type. This will allow you to edit or remove columns for that Card. You can also configure the expanded view of that Card.
Freestyle Card
To add a Freestyle Card, click the + icon, choose Freestyle, and give your Card a name. You will then have a free text area. You can enter any information you like and format it using the toolbar at the top. You can insert hyperlinks, images, or links to other Boards. You can also use the source edit option to have full HTML capabilities. With HTML, you can design your freestyle card or copy HTML from other applications to display information.
People List
To add a people list, click the + icon, choose People List, and name your list. By default, the system will pull in all the different user types. You have many options for filtering your list. For example, you can bring in all the users for a location, only the front-line users, or super users.
Report Card
Every report available in the report section of KaiNexus is available to be placed in a Card on a Board. Simply choose the report you'd like to include and give your Card a name. You have filters available. You can filter by date, type, Location, and completion status.
Widgets Card
Again, you'll choose the Widgets Card by pressing +. Once your widgets card is named, you can decide how many items your Widgets Card will include. The number of rows indicates how many items you will include. You display the items in one or more columns.
Board Layout
 You can drag and drop the cards to where you want them to be on your Board. You can also vary the number of columns by introducing Board sections. To do so, click the ellipsis of the Board and choose edit. There you can decide how many sections you'd like your Board to contain and how many columns should be included in each section. You can drag and drop cards between sections or use the ellipsis to select Move Up or Move Down Section.
There are several ways to change the height of the cards on your Board. If you hover over the bottom line of any card, you'll see the adjustment indicator, and you can simply drag it to resize your Card. Or you can also define your Card's height by the number of pixels with the Layout option under the ellipsis for the Card. This is especially useful if you have two cards next to each other and you want them to be the same height.
There are two ways to apply header colors to each of your cards. If you want to apply a global header color that is uniform throughout the Board, go to the ellipsis for the Board itself and set default card headers. If you want to change the header color of any specific card, click the ellipsis for that Card, choose Layout then Edit Headers. Here you can change the text and background colors for that particular Card.
For best results, refresh your screen once you've placed all of your cards where you would like them on your Board.
Deploying a Board
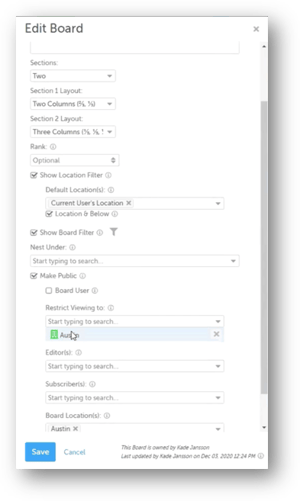
Once you are satisfied with your Board's content and layout, you are ready to deploy it. The edit screen of the Board gives you a few options, including Make Public. If the box is not checked, the Board will be a personal Board available only to you.
By clicking the Make Public option, you can share your Board with everyone or restrict viewing to determine who can view the Board. By default, viewing will be limited to your Location. To make it public to everyone in the organization, remove the location restriction. You can also restrict viewing to specific users, locations, departments, or roles.
Once you make a Board public, you can nest it under another Board to create multi-level Sub-Boards.
Pro Tips
Setting a home Board: If you want a particular Board to be your primary view for KaiNexus, you can make any Board a default Board by choosing that option under the Board's ellipsis.
 Manage Boards tool: This tool allows you to see all of the Boards you have access to in KaiNexus. If you manage many Boards, the Bulk Change tool enables you to make changes to many different Boards at once. Here you can:
- Change the Parent Board
- Change Viewing Restrictions
- Change Editors
- Manage Subscribers
- Change Locations
- Change Owners
- Delete Boards (Use caution!)
We hope this overview of the Boards function of KaiNexus has been helpful. If you have additional questions, please don't hesitate to reach out. You can also check out the Boards and Best Practices in KaiNexus webinar below:


.svg)


Add a Comment